


If the old ceiling is getting on in years, it may have cracks and stains or the plaster may be crumbling in places. Then it’s time for a new ceiling. With a stretch ceiling installation, you can quickly give your rooms a new look. Even unsightly wooden ceilings can be wonderfully concealed. Stretch ceilings have proven their worth in the renovation or redesign of residential and commercial spaces since the 1970s. Sloping ceilings, curves, existing lamps, unusual layouts and air conditioning systems – none of these are obstacles. Then as now, the advantages of the ceiling system are appreciated. In our “Things to know” section, you can find out how quickly and easily you can achieve a new ceiling with stretch ceiling installation.
Contents
Does the room have to be empty for stretch ceiling installation? How long does it take to install the stretch ceiling?
The stretch ceiling is installed within a few hours. The room does not have to be emptied during installation. The furniture can remain in the room. Just make sure that the center of the room is clear and that the stretch ceiling installer is able to attach the strips for fastening the stretch ceiling to the wall or ceiling.
However, objects that melt easily should be removed from the rooms, as the room is heated to around 40-60°C during stretch ceiling installation. Incidentally, stretch ceilings do not create any dirt during installation, as is the case with plasterboard ceilings, for example. Another advantage of Qubo® stretch ceilings is that there is no unpleasant odor, as is the case with cheap products.
Planning stretch ceilings Measuring the existing ceiling
As soon as you have decided on a stretch ceiling, the specialist company will take a look at the premises on site and measure the existing ceiling. You then choose your favorite option from a range of materials and colors and plan where ceiling lights should be installed. Once the installer has measured the rooms and you have decided on a specific stretch ceiling, you will receive a cost estimate from the company.
Planning stretch ceilings Making the stretch ceiling
Each stretch ceiling is made individually for each room. An exact drawing must be created for each room. Based on this drawing, the ceiling is produced by the manufacturer within a few days.
Preparatory work for stretch ceiling installation Installing stretch ceilings
The new stretch ceiling is installed a few centimetres below the old ceiling. Cables, ventilation pipes, water pipes or backlighting can be concealed in the resulting gap. If you want to reduce the room height for any reason, install the stretch ceiling at a greater distance from the ceiling.
Next, the brackets for the lamps are attached to the ceiling and then the electrical cables are laid.
Installation of the stretch ceiling
The manufacturer cuts the film to the correct size. In order to achieve a good surface tension, the new stretch ceiling is made approx. 7% – 10% smaller than the original ceiling surface.
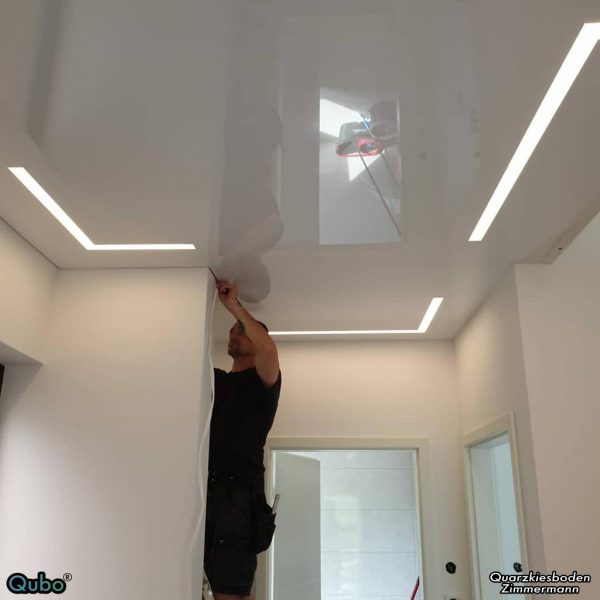
To install the stretch ceiling, aluminum or plastic profiles are attached to the inside of the room. The profile strips have a groove into which the film is inserted using a special tool. Heating the ceiling film to approx. 40°C – 60°C makes it flexible and easy to stretch. This allows it to be easily attached to the profiles.
Once the room has cooled down to normal room temperature after covering, any creases are treated with heat. The result is a completely even and smooth surface. Any excess film is cut off after covering.
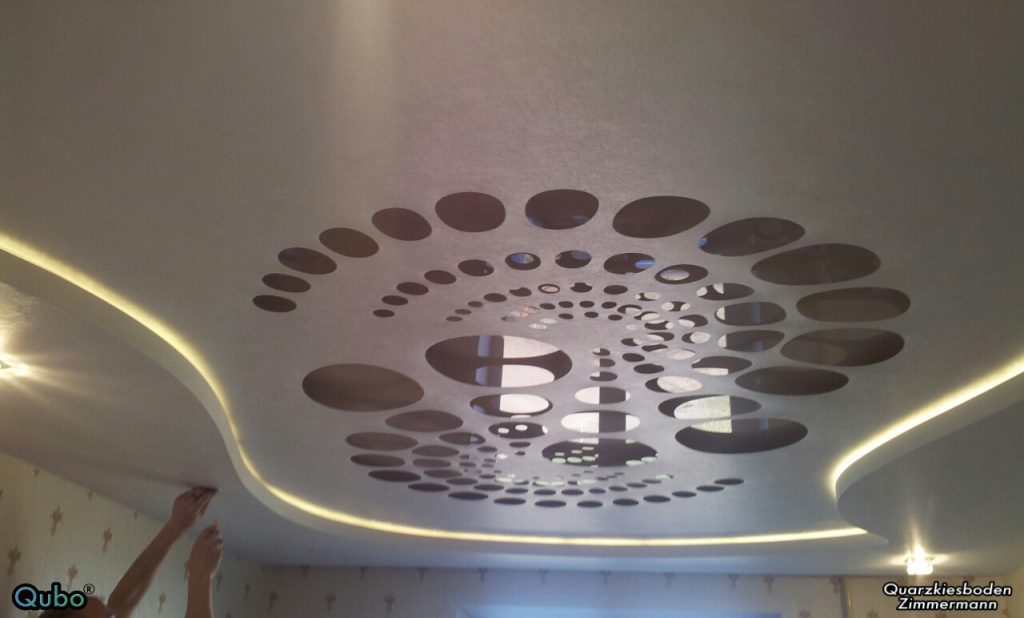
Special sockets enable the integration of lamps Stretch ceiling lighting
To integrate the planned lamps into the stretch ceiling, the film is cut in the appropriate places and provided with specially made rings. The lamp holders can then be mounted here and connected to the power supply.
The stretch ceiling can be unhooked at any time in order to lay further cables or install additional lamps. Recessed spotlights are just as possible as pendant lights, chandeliers and even perimeter or surface lighting with LED strips. This means that the respective room can be used flexibly even after installation, thus …
… for a strong appearance!